What causes diastasis recti in men and women, how to identify it and 13 healing exercises to begin strengthening the core from diastasis recti.

Have you ever heard of Diastasis Recti? It’s a condition of the abdomen that affects millions of people, many who aren’t even aware of it.
Some people are under the assumption that it’s a condition that only affects postpartum women, but that’s not true. Men and women who’ve never been pregnant can have diastasis recti too.
- If you’ve ever been pregnant or intend to one day become pregnant, chances are high it may impact you.
- If you’re a man middle-aged or older (or a younger man planning to reach a ripe old age someday), it could impact you.
- If you’re a middle-aged or older woman who hasn’t had children, it could impact you.
Today, we’re going to take a look at this surprisingly common condition, who it impacts and 13 targeted exercises you can do to help safely strengthen and heal your core. (This post originally included 5 healing exercises for Diastasis Recti, but I’ve updated it to include eight new awesome Diastasis Recti friendly exercises!)
Jump ahead to:
What is Diastasis Recti?
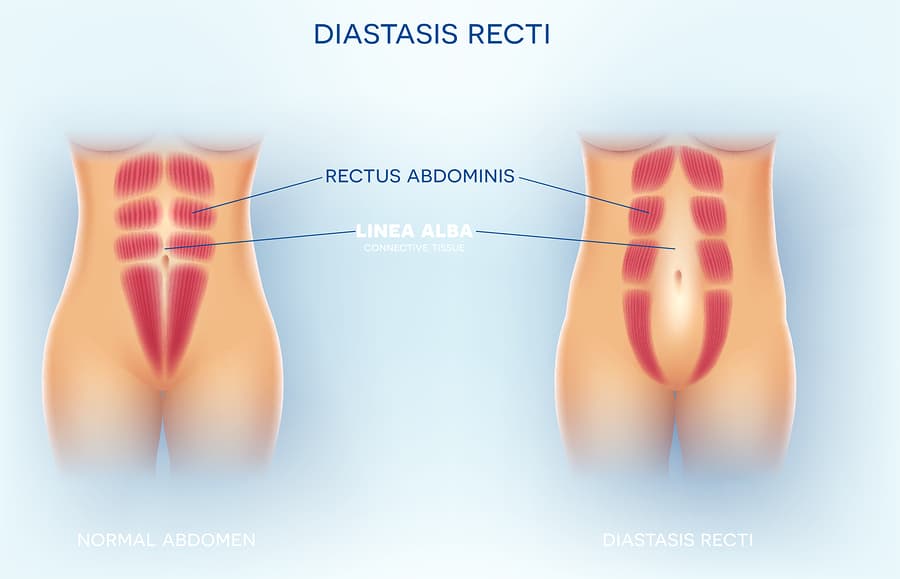
According to the Mayo Clinic, Diastasis Recti (DR) is a condition in which the large abdominal muscles separate along the linea alba.
It often goes unnoticed to the untrained eye and many individuals (male and female) living with DR are completely unaware of it.
This separation between the abdominal muscles can create a bulge down the mid-line of the abdomen.
As a personal trainer, I’ve seen this condition in a number of my clients. They’ve often described feeling frustrated with a perpetual “stomach pooch” or “mummy tummy” that, no matter how much weight loss success they experience through diet and exercise, won’t go away.
The reason people with DR can’t “lose the pooch” is because it isn’t simply an extra 5-10lbs of belly fat; it’s a gap between their abdominal muscles.
DR may also trigger other symptoms like lower back pain, posture problems and even some bloating and constipation.
Postpartum Diastasis Recti
 Diastasis Recti is quite commonly experienced during and after pregnancy.
As the uterus expands during the nine months in pregnancy, it places a gradually increasing pressure on the large muscles in the abdomen.
This constant pressure stretches and can gradually weaken those muscles, creating a division down the middle of the rectus abdominis.
 With time, this condition can sometimes heal and self-correct itself.
In some cases it’s not uncommon for a woman to experience and heal from DR without ever being aware of it in the months following a pregnancy.
But with multiple pregnancies, high birth weight babies or in women who become pregnant after 35 years in age, this weakening of the abdominal muscles can become more severe.
 In some cases, it can be difficult or impossible to completely heal without corrective surgery (i.e. a “tummy tuck”). And that surgery may come with a fairly hefty scar.
Don’t let that leave you in a panic.
Many women have been able to greatly strengthen and improve that separation without having to undergo surgery.
This is often because they’ve taken the time to strengthen and rebuild their core and pelvic floor by performing DR appropriate exercises.
Diastasis Recti in Men
 DR is very commonly associated with pregnancy but it’s not a ladies-only condition; men can be impacted by it as well.
While it tends to occur earlier in life for women, it can manifest later in life for men, typically during or beyond middle-age with abdominal obesity.
The continual pressure (sometimes applied over the course of many years) on the abdomen by a significant concentration of abdominal fat can also cause a gradual weakening of the muscles that creates a separation.
Even fairly healthy, active men can be impacted by DR, particularly if they have a significant concentration of visceral fat (a firm fat associated with heart disease, high cholesterol and high blood pressure that is often present in “beer bellies”) in the stomach.
I’ve worked with numerous male clients with DR as a personal trainer. And they weren’t morbidly obese. Some have been in good health, regularly active and with positive cholesterol and blood pressure levels.
 During one of my personal training sessions with a male client, I noticed he was presenting some signs of DR during an abdominal exercise.
I shared my observations with him, recommending he get it checked out by his doctor. In the mean time, we changed up his exercise routine to incorporate DR friendly exercises just to be on the safe side until his doctor could confirm a diagnoses.
Sure enough, he later reported that his doctor confirmed it was indeed DR and referred him to a physical therapist.
He told me that in his physical therapy sessions, they went over the do’s and don’t’s of exercising the core with DR (there are quite a few “don’ts”). Many of the movements the therapist had him perform were the same types of exercises we had incorporated into his personal training sessions.
It’s also possible DR can present in women with abdominal obesity after middle-age, whether or not they’ve ever been pregnant.
Diagnosing Diastasis Recti
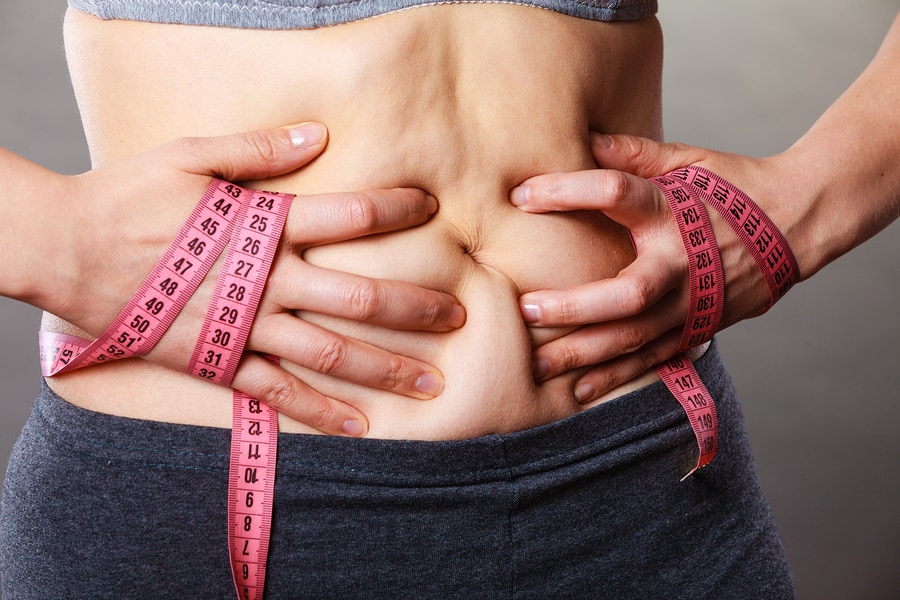 Of course, the only qualified person who can give you a confirmed diagnose for DR is going to be your doctor. If you think you may be experiencing DR, the best thing to do is schedule an appointment to talk to your doctor about it.
But there are some observable clues that might be pointing to a case of DR.
The separation caused by DR can cause a bulge or “pooch” down the mid-line of abdomen where the two large muscles have spread apart. This bulge is often most observable when the abdominal muscles are tense or being contracted, like during leg lifts, sit-ups or when you move from lying on your back to sit upright.

There are even some very simple self-check tests you can conduct on your abdomen at home to look for signs of DR, like in this simple 2-minute video of a DR self-check (above) by trainer Natalie Hodson, who specializes in prenatal and postnatal training on her Youtube channel.
The Do’s and Don’ts of Diastasis Recti
 You might think that the solution to fixing weak core muscles it to start cranking out planks and crunches to try and strengthen them. But you’d be wrong.
Core training is different with diastasis recti. Certain types of abdominal exercises can actually do more harm than good.
Planks, crunches, and certain twisting movements can actually aggravate the condition. They place additional stress on the separation between the muscles in the rectus abdominis.
Fortunately, there are still many safe ways to exercise and strengthen the core with DR.
Movements that target the lower abdomen, obliques and focus on keeping the core drawn in and squeezing the belly button towards the spine can help re-strengthen the abdomen without worsening the separation.
Today, we’re going to take a look at 13 DR-friendly exercises to help strengthen the core.
Exercises for Healing Diastasis Recti
Disclaimer: I am not a doctor. I am a nationally certified personal trainer, but I’m not your personal trainer. The following information is for educational purposes only and not to be interpreted as advice. If you think you might be suffering from diastasis recti, consult with your doctor to get a diagnosis and clearance to begin an exercise program.
Hip Bridge Lifts

Level: Beginner friendly.
A lot of people associate hip bridge movements with lower body muscles (like the glutes, hamstrings, lower back, etc.) and the pelvic floor.
While they’re indeed great for all those things, bridges also help target and strengthen your lower abdominal muscles and are both diastasis recti friendly and therapeutic.
Lay on your back the floor with your knees bent, feet flat on the ground and hands by your sides palm-down. Press your feet into the floor, lifting your hips towards the ceiling as you contract the core, buttocks and hamstrings. Hold for one second then slowly lower back down to the floor.
The key in targeting the lower abdomen in hip bridges is to slow down and focus on really contracting your core muscles as you lift and squeeze. Squeeze your belly button back towards your spine and visualize pulling together the two sides of your abdomen like you are trying to close the gap between them.
Candle Exhales

Level: Powerful for all levels (beginner – advanced).
Candle exhales are a powerful breath-centered core training exercise for diastasis recti. They can be performed from a variety of positions, including:
- Standing against a wall (as demonstrated in this video)
- Sitting in a chair
- From a table top potions (on the hands and knees)
- Laying on the floor (with your knees bent, feet flat on the ground)
They key focus is the breath and core contraction in a candle exhale. Watch the video for a detailed step-by-step process of how to perform this exercise. You will hold the contraction for a specific period of time (I recommend using a timer to time yourself). Many of my clients begin with working to maintain the contraction of this exercise for one minute.
You can increase or decrease the difficulty of this exercise based on how long you hold the contraction (holding it for 60 seconds will be more challenging than 30 seconds, and so on). Keep in mind, you are not holding your breath, but rather holding the contracting and taking small controlled breaths that allow you to hold that contraction for the designated period of time.
Heel Slides

Level: Beginner friendly.
Heel slides are a well known and trusted core movement for diastasis recti friendly training. Once again, the key here with DR core training is to move slow and controlled. I find it helpful to perform this exercise in socks to help your foot slide more seamlessly over the surface of the floor.
Lay on the floor with your knees bent at a 90 degree angle, feet flat on the floor. Slowly slide one leg out on the floor until it is fully extended straight and them slowly draw the leg back in until it returns to a bent 90 degree position.
As you slowly slide your heel from a bent knee position to an extended position, keep the belly button drawn in towards the spine, pulling those two separated sides of the core together throughout the movement so there’s no “bulge” or “pooch” in the abdomen.
Single Leg Extensions

Level: Intermediate.
Single leg extensions have a very similar range of motion to the heel slides, but are slightly more advanced.
Lay on the floor with your knees bent at a 90 degree angle, feet flat on the floor. Pick one foot up off the ground, drawing the knee towards the chest while maintaining the 90 degree angle of the knee. Slowly extend the leg out straight, allowing the leg to hover off of the ground at the point of full extension and then draw the knee back into the chest.
Keep the belly button drawn in towards the spine, pulling those two separated sides of the core together throughout the movement so there’s no “bulge” or “pooch” in the abdomen at any time.
Single Leg Lifts

Level: Beginner friendly.
Single leg lifts help to target the lower abdomen and obliques.
They’re different from standard leg lifts (where you raise and lower bother legs together) and allow the exerciser greater support to keep their core muscles drawn in throughout the movement. Think about keeping belly button drawn in towards the spine and pulling those two separated sides of the core together throughout the movement so there’s no “bulge” or “pooch” in the abdomen.
For this movement you will lay with you back flat on the ground, one leg bent with the foot flat on the ground and the other leg extended out straight on the floor. You can place your hands on the abdominal separation with a gentle pressure for support (and to remind yourself to keep the core drawn in tightly).
Keeping your hips and lower back firmly grounded on the floor, lift the extended leg straight up towards the ceiling as you exhale and contract the abdomen. Slowly lower the leg back down until it hovers just over the floor and then repeat.
Once again, slow down. Take your time. Focus on squeezing the belly button towards the spine as you exhale all your air (pulling that gap together).
Single Leg Marches

Level: Beginner friendly.
Single leg marches are another beginner-friendly exercise that help target the lower abdomen. Similar variations of this movement include “heel taps” and “toe taps”.
Lay on the ground with your knees bent, feet flat on the ground. Place your hands on either side of you, palms facing down. Lift one foot off the ground, keeping a bend in the knee. Slowly lower the foot back down onto the floor. Repeat.
Make sure you’re moving slow and controlled. Keep the belly button drawn in towards the spine, pulling those two separated sides of the core together throughout the movement so there’s no “bulge” or “pooch” in the abdomen at any time.
Alternating Heel Taps

Level: Beginner friendly.
Alternating heel taps are a slightly more advanced version of heel taps, but still quite beginner-friendly.
Lay on the ground with your knees bent, feet flat on the ground. Place your hands on either side of you, palms facing down. One by one, carefully lift your feet off the ground so that leg legs are elevated with a bend in the knees.
Slowly lower one foot down, tapping the heel on the floor, and then lift it back up returning to the starting position. Repeat with the other leg, alternating back and forth.
Keep the belly button drawn in towards the spine, pulling those two separated sides of the core together throughout the movement so there’s no “bulge” or “pooch” in the abdomen at any time.
Reverse Crunches

Level: Intermediate.
Reverse crunches are different from regular crunches. They target the lower abdomen, not the transverse abdomen, making them a diastasis friendly core exercise.
Lay on the ground with your knees bent, feet flat on the ground. Place your hands under your lower back for support. One by one, carefully lift your feet off the ground and draw the knees in towards your chest so the legs of elevated from the floor.
Engage your core as you lift the hips, tailbone and lower back off the ground, driving your knees toward your chest. Carefully lower the hips back down onto the floor with control, careful not to drop the legs.
Straight Leg Reverse Crunches

Level: Intermediate to advanced.
Yet another core movement to target the lower abdomen, these straight leg reverse crunches will have you feeling the burn in all kinds of positive ways.
You can either place your hands under your lower back for support or potentially lay in front of a sturdy beam (or other anchored object, like a heavy piece of furniture) and allow your hands to reach overhead and behind you to hold onto it for support.
Lay on the ground with your knees bent, feet flat on the ground. Place your hands on either side of you, palms facing down. One by one, carefully lift your feet off the ground and draw the knees in towards your chest so the legs of elevated from the floor. Extend your legs straight into the air.
Engage your core as you lift the hips, tailbone and lower back off the ground, driving your feet up like you are trying to touch the ceiling with your toes. Lower the hips back down onto the floor with control, careful not to drop the legs.
Modified Knee Drops

Level: Beginner friendly.
Knees drops (also known are side knee drops or bent knee fall outs) help target the pelvic floor and lower abdomen. Modified knee drops (with the feet on the floor) are a beginner friendly place to start out with this movement. Remember,
Lay on the ground with your knees bent, feet flat on the ground. Keeping the bend in your knee, allow one leg to extend outward falling away from the abdomen as far as it will extend. Then slowly draw the leg back in to the starting position. Inhale as the leg falls away, exhale as you draw the leg back in.
Keep the belly button drawn in towards the spine, pulling those two separated sides of the core together throughout the movement so there’s no “bulge” or “pooch” in the abdomen at any time.
Knee Drops

Level: Intermediate
Lay on the ground with your knees bent, feet flat on the ground. One by one, carefully lift your feel off the ground and draw the knees in towards your chest so the legs of elevated from the floor.
Keeping the bend in your knee, allow one leg to extend outward falling away from the abdomen as far as it will extend. Then slowly draw the leg back in to the starting position. Inhale as the leg falls away, exhale as you draw the leg back in.
Keep the belly button drawn in towards the spine, pulling those two separated sides of the core together throughout the movement so there’s no “bulge” or “pooch” in the abdomen at any time.
Forearm Plank Hip Dips

Level: Intermediate to advanced.
Now we mentioned before that there are certain plank movements that you want to avoid, like standard static planks or static forearm planks.
But there are other plank variations that target the internal and external obliques that are DR friendly.
This variation of plank hip dips helps to target the obliques. It can be done from a forearm position (like I’m demonstrating in the video) or in a standard straight arm plank.
From a forearm plank position, swivel the hips from left to right in a dipping motion, as if you were trying to gently tap your outer hip back and forth on the outer corners of your mat. You can modify by coming into a modified straight arm plank on your knees.
Tapping the hips from left to right completes one full repetition.
Side Plank Hold
Level: Beginner friendly (see modifications)
Believe it or not, side planks are also another DR friendly plank variation. Unlike a standard plank, they don’t put stress direction on your rectus abdominis but rather help strengthen the internal and external obliques.
Hold the side plank for 60 seconds per side, keeping the core tight, squeezing the belly button towards the spine and not allowing the hips to sag towards the floor. Keep your elbow in line with your shoulder. Hold for 60 seconds per side.
Building up to a 60-second side plank can take time and practice. If you can’t hold a side plank with good form for 60 consecutive seconds, try performing an accumulative 60-second side plank.
To do this, hold the side plank for 15-20 seconds, lower down and take a resting breath, then raise back up into the side plank for another 15-20 seconds until you accumulate a total of 60 seconds.
Side plank holds can be done from a straight arm or forearm position. In this video, I’m demonstrating a straight-leg forearm plank (my feet at stacked one on top of the other). This can also be performed in a modified side plank. To modify, place your bottom knee on the floor for support and keep the top leg extended straight with the top foot resting flat on the floor.
Building a Diastasis Recti Workout Circuit
I often have my personal training clients incorporate some of these movements into a workout circuit. You can build your own exercise circuit by choose five of the exercises (I always try to include at lease one or more of the timed movements, like the candle exhale or side plank hold). Perform 15 reps of repetition-based movements and 60 seconds for time-based static movements.
Perform 3-5 rounds of the total circuit.
Example beginner workout:
- 60 Second candle exhale
- 15 Heel slides (per side)
- 15 Reverse crunches
- 15 Modified knee drops (per side)
- 60 Second accumulative modified side plank hold
Example intermediate to advanced workout:
- 15 Hip bridge lifts
- 15 single leg extensions (per side)
- 15 Plank Hip Dips (tapping from left to right = 1 repetition)
- 15 Straight Leg Reverse Crunches
- 60-Second Side Plank Hold
Rest 15-30 seconds between exercises and 45-60 seconds between rounds.
Final Thoughts on 13 Healing Exercises for Diastasis Recti
Many people can be impacted by DR, but that doesn’t mean that they can’t safely train to re-strengthen their core. Training with DR friendly exercises may help aid in the healing process in individuals with less severe cases of DR.
And although some more serious cases of DR can result in a permanent abdominal separation, it’s no reason to panic or despair. There are still many safe and effective ways to keep the core strong, minimize the gap between the abdominal muscles and lead a happy, healthy life without corrective surgery.


More Awesome Home Workouts
Ready for your next workout? I’ve got plenty of awesome home strengthening workouts as well as full-length yoga classes. Check out the list below!
Related workout articles
- 10 No-Gym Needed Home Workouts
- Core Moves for Diastasis Recti
- How to Run (When You Suck at Running)
- Home Yoga Routine for Sciatica
- Restorative Home Yoga Routine
- How to Make a Homemade Kettlebell
- 5 Moves to Tone Your Upper Body
All writing and exercise videos © 2019 Rachel Elise Woods. Self-check video for diastasis recti by Natalie Hodson shared with permission by Natalie Hodson. Published 09-05-2019. Upated 11-09-2020.
Article References
1. Yvonne Butler Tobah, M.D. “Pregnancy and Your Stomach Muscles.” Mayo Clinic, Mayo Foundation for Medical Education and Research, 5 Aug. 2017, https://cutt.ly/wwnAdWU
2. Chertoff, Jane. “Diastasis Recti: Symptoms, Treatment, Prevention, and More.” Healthline, Healthline Media, 8 Mar. 2019, https://cutt.ly/SwnAkUg.
3. Alesandra Dubin. “Diastasis Recti: Will You Need Surgery?” Parents, Parents, retrieved 4 Sept. 2019, https://cutt.ly/6wnAAeN.
4. Bryant, Cedric X., and Daniel J. Green. ACE Advanced Health & Fitness Specialist Manual: the Ultimate Resource for Advanced Fitness Professionals. American Council on Exercise, 2009. https://cutt.ly/dwWbJJx
Kileen says
I had a pretty big gap from diastisis recti, but these exercises are great for healing and helping!
Kileen
ReeseWoods says
That’s great to hear!
Aria | Blogs by Aria says
Thanks for sharing these exercises I’ll hive them a try and see how much of a difference it makes.
ReeseWoods says
Go for it!
Christa says
This is such an important post! DR is so common and so many people think they can’t exercise because of it. Learning how to exercise safely is key.
Christa says
This is such an important post! DR is so common and so many people think they can’t exercise because of it. Learning how to exercise safely is key.
ReeseWoods says
Absolutely! You can 100% still exercise safely with it!
Lisa Favre says
I will have to save this/pin this because I am pretty sure I have diastasis recti and it’s so hard to work out with it. I have lost weight everywhere except my stomach.
ReeseWoods says
It’s a common problem for many people!
Rachel says
I need these exercise tips! I can’t wait to share them with my other DI friends!
ReeseWoods says
I so glad to hear that!
Aimie says
Hi
According to the MUTSU workout and other workouts I have seen online, straight leg lifts are not recommended and can make Diastasis Recti worse which apparently according to some sources is the same for side planks.
There is so much confusing information out there. Are your exercises tried and tested? Are you sure they don’t make the separation worse?
Thank you
ReeseWoods says
Hey, Aimie!
If you’re been diagnosed with diastasis recti, I would encourage you to talk with your doctor and get a reference to a good physical therapist to discuss concerns about specific movements.
That being said, I’ve worked with numerous personal training clients who have come out of physical therapy for disatasis recti. They were familiar with the movements in this blog post and told me their physical therapist had them performing the same movements and other similar types of movements (including side planks, single leg lefts, single leg toe taps and more). There is also much research that supports side planks as a safe and effective core movement for individuals with DR.
You are absolutely correct that if you were performing a standard double leg lift (raising both legs at the same time), that could be strenuous to the separation of the core muscles. Any movement that puts excess strain on the rectis abdominus and causes that “pooch” to bulge out (double leg lifts, standard planks, crunches, etc.) can worsen the separation of the core in individuals with diastasis recti.
However, I am demonstrating single leg lifts, not double leg lifts. They are different in the manner they allow the exerciser to keep their core muscles drawn together (think belly button drawn in, pulling those two sides of the core together throughout the movement) so there’s no “bulge” or “pooch” in the abdomen. And the movement also lets them more specifically target the lower abdomen and obliques (areas of the core that can be safely targeting with diastasis recti).
I also demonstrate straight leg reverse crunches (all reverse crunch variations help target the lower abdomen), which are different from leg lifts (and notice that I entered into the exercise with bent knees which I then extend straight up into the air rather than entering the movement by performing a double leg lift to straighten the legs).
Of course, I encourage everyone to speak with their doctor and physical therapist and move forward with what feels like the best option for themselves from there. But I hope some of that helps clear up my position on including these! Great questions and topics of discussion!
Tiffany says
This was so informative. That pooch is such a struggle to get rid of , but maybe this is why!
ReeseWoods says
It could definitely be a possibility!
Christie says
These are such great tips and exercises I can’t wait to try out!
ReeseWoods says
Go for it!
Nina says
This was a super great great and I loved how you showed exactly how to do these exercises, I need to start doing this to strengthen my core!!!
ReeseWoods says
I’m glad you enjoyed it!
Rebecca Cherry Kelso says
Can you provide a printable list with instructions for DR?
Reese Woods says
Hey, Rebecca! For more detailed or personalized program than the information provided in this article, you can contact me via the “Train with me” section of this website to set up a consultation for virtual training or exercise programming!